As a Merchant Administrator, you can configure PayNow links to use in a variety of ways. You can use it in Xero to get a payment for an invoice through the Xero interface, you can generate a Quicklink to get payment either through a url or through the Wise-Pay Virtual Terminal in ConnectWise, or you can use it in the ConnectWise Customer Portal.
How do I get there?
To configure your PayNow Links, click Configure from the top menu and select Merchants and click Edit Merchant > PayNow Links tab
What do I do?
This integration is a two-step process:
- Generate the PayNow Link in Wise-Pay
- Configure third-party application with PayNow Links connection details
Generate Wise-Pay Proxy from Wise-Pay
To generate proxy information, configure the settings below and click Save once done;
| PayNow Link Type | Select the third-party application to configure: |
| Generate | Click to generate the PayNow Links Information. Once generated the PayNow Links will be displayed in the list of PayNow Links as an active payment link. |
| Display | Click Display to view the record in the PayNow Links Details popup. The following fields are displayed: PayNow Link Type: This is the third-party application being configured API Key: API key generated in Wise-Pay URL: The URL that the third-party application will use to submit recurring Payments |
Configure third-party application with PayNow Links details
Step 1: Generate PayNow Url in Wise-Pay
- Click Configure
- Click Merchant
- Click Edit
- Click PayNow Links Tab
- Select the PayNow Link Type: Xero
- Click Generate
- Click on: Display
- Copy the following details into the Xero Payment Services Configuration Screen in the following steps:

Note:
The above values are for illustration, your settings will be displayed and need to be copied exactly.
Step 2: Copy PayNow Link to Xero
- Log into Xero
- Click Settings
- Select General Settings
- Select Invoice Settings
- Click on Payment Services button at the top of the Invoice settings page
- Click + Add Payment Service button
- Select from the list: Custom Payment URL
- Enter Wise-Pay in the Name field
- Enter the URL into Your Custom URL field
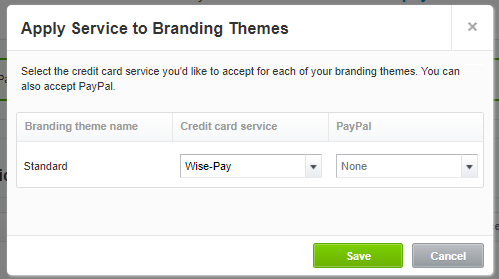
Step 3: Apply Payment Services
To enable payment services for invoices, you need to set each branding theme to use Wise-Pay
- Click on Managed Theme
- Select Wise-Pay
- Click Save
Step 1: Create a Quicklink
- Click on the Configure Menu > Merchants at the top
- Click on the Edit icon
- Click on the PayNow Links Tab on that Top application tabs.
- Select Quick Link from the link type drop down list
- Click Generate.
- Click on Display to display the link
- Copy the Quick link URL including the long TransactionId
- Press Save
- Bookmark the url
- If you wish to configure the Quicklink in ConnectWise, move onto to Step 2
Note:
Quicklinks are for Merchant-use only, they are not to be provided to your customers to use.
Read more about the power of Quicklinks here.
Step 2: Create the Custom User Menu in ConnectWise
- In ConnectWise, click on the Setup Tables
- Search for "Custom Menu Entry"
- Create a New Custom Menu Entry
- Enter the Title: Wise-Pay Virtual Terminal
- Enter the Quick Link copied from Step 1 into the Link field
- Download the Wise-Pay Logo and save this in a place to access later
- Access the place where you saved the file (you will need to change the file filter to include png files)
- Uncheck the "Open in New Window" checkbox.
- Select which Locations should be excluded (if you want to limit access to this menu).
- Press Test - To ensure that the link has been saved correctly, if it does not work, repeat the process at Step 1.
- Press Save, your link will be visible when you close and reopen ConnectWise.
Note:
Virtual Terminal will only display the outstanding payment details for an invoice, not any customer details - it is important that you confirm details with the customer to ensure that you are paying the correct invoice.
- Log into ConnectWise
- Click System
- Click Setup Tables
- Search for Portal Configuration
- Edit Portal Configuration
- Click on the Invoices Tab
- Select Yes to enable online payments if it is presently disabled
- Select Authorize.Net from the Payment Processor
- Enter the Transaction Key into both API Login and Transaction Key
- Enter the Live URL into the URL
- Test Transactions - ConnectWise will simply test that the connectivity to the Wise-Pay processor is active, no test transactions are processed.
- Click Save